Monday, April 29, 2019

Technology Final Reflection


I have always considered myself “technology saavy” – I love to keep up with all of the new emerging technologies that I discover. However, through this course, I have found new ways to integrate these technologies into the library for my use and for student use. For example, I was so excited to learn about integrating comics and cartoons into the library. Graphic novels have been so popular in my library, and what a great way for students to demonstrate their understanding of concepts! We are taking something that students are already enjoying and can connect with, and applying it to instruction!

My biggest “take away” from this class was sort of a “mash-up” of the “Youtube” module and the “Screencasts” module. Videos and screencasts can be created for the library in so many ways! My goal in my role as librarian is to begin a Youtube channel with resources for teachers and students. Some of the videos that can be included on my channel are: booktalk videos, new books we’ve added to our collection, informational slideshows, informational how-to videos, videos of past events (reading celebration parties, reading initiatives, etc.), videos of student learning, etc. I think this is a resource that would be most beneficial to teachers, students, parents and the community to showcase what is happening in the library. I enjoyed exploring some of the Youtube channels of other libraries as a model of how videos can impact the school community.

Here are some of the technology tools that I have learned can be beneficial to educators:

Blogs are a great way to update parents, students and staff of things that are going on in the library. By following blogs through Blog Readers like Inoreader, you can have access to a wealth of information from other educators.

Social media apps like Facebook, Twitter and Instagram are a great tool to use to advocate for your library and let others know of all the wonderful things you are doing! It is a great way to keep parents connected and let them know about upcoming events. Social media is another way that educators can connect with others and share ideas, especially through the use of groups. There are several Facebook “groups” that I am a part of and it is wonderful to be able to access these groups when I have questions, need ideas, etc.

This semester, I really began to understand the importance of infographics in relaying information in a new and visual way. We receive information in so many different ways, but infographics allow us to process the information differently. Students can use the information they learn to create an infographic to share their ideas and thoughts with others.

Screencasts are an incredible resource for educators. It makes it easy to walk through information on the computer and create a “how to” video. This can be as easy as walking through the syllabus of a course or can also be used to reiterate instruction of content. In the library, screencasts can be used to demonstrate how access online resources or the online catalog. It is an excellent resource for demonstrating content to students, staff and even parents.

As mentioned above, I loved this unit. I think that YouTube videos is a great way to reach students in a method that they are familiar with. There are so many ways that YouTube can be utilized. Animoto can be used to create book trailers for new books, which can then be uploaded to YouTube. A slideshow of new books to the library can be created and made available to patrons.

There are so many ways that QR codes can be used in the library, as well. These codes can be linked to websites, videos, audio files and more! QR codes can be placed on flyers and then be linked to additional information and/or sign-ups for events.

With graphic novels becoming so popular, cartoons and comics are a great way to connect with students and allow them to showcase their learning! With tools like ToonDoo or Pixton, students are able to create their own comics! What a great way for teachers to assess learning in the classroom, while allowing the students to create!

Podcasts are becoming more and more popular. In fact, it was showed in my Podcast blog post that 44% of Americans ages 12 and older have listened to a podcast sometime during their lifetime (Pew Internet Research).This can be a resource for educators, as there are many podcasts available in the field of education. However, this can also be a great tool for students. By hosting a podcast, students can demonstrate assessment of mastery while presenting to a global audience!

See my video below for my digital reflection of integrating technology!
https://spark.adobe.com/video/J1QWUXQFHPABx


Saturday, April 13, 2019

Podcasts


Podcasts

Podcasts are a great way for teachers to provide information, but they are also a wonderful tool  for students to use to create and share knowledge and information. Podcasts are audio recordings that are similar to blogs, but available in an audio format and they are becoming increasingly popular in today’s society. According to the PEW Research Center, 44% of Americans ages 12 and older have listened to a podcast sometime during their lifetime. 26% of Americans have listened to a podcast in the past month. These statistics show that the number of people who listen to podcasts are on the rise.

My partners and I created a Podcast on “Genrefying the Library.” This is a topic that is often debated in the world of libraries. Listen to the podcast below to hear the pros and cons and other important tips for genrefying your collection.

We used Garage Band for the initial audio recording and Wevideo to edit the file. Then we converted the video file  to an audio file and uploaded the file to Podbean as our “hosting site.” Click the link below to listen to our podcast on Genrefying the Library.


The platform that we used to record our podcast was Garage Band. While this app provided much more flexibility in regards to adding music and other sounds, it did have some negatives. This app is only available to people who have an apple product (such as an iphone, ipad, or apple computer). It was a bit of a learning curve…it took me some time to figure out how to make the bar length longer in order to record our entire podcast. I also wanted to turn the metronome off while I was recording. I was able to adjust the huge echo effect that was present during my very first recording. After some practice, I ended up with a great sound file that I shared with my partners. However, we did encounter some problems in sharing the Garage Band file. We tried to use Google Drive as a method of sharing, but were not able to reopen the file after it was shared it ended up being an “unsupported file type.” We were able to use the audio file downloaded from Garage Band to Overall, once you learn the little “quirks” of Garage Band, it was fairly simple to record.

Podbean is another free podcast hosting site that can be used in creating and sharing podcasts. This is a platform that I have used in the past in hosting podcasts. When using this platform, I usually record my podcast using Audacity, which I then export as an .mp3 file and upload to Podbean as the hosting site. This process is fairly simple, but it appears to be more of a site for “hosting” than for recording/editing podcasts. Once the audio file is uploaded to Podbean, the podcast can be given a title and listened to from the website. It also has a share button where the podcast can easily be shared to Facebook, Twitter, Linked In or Tumbr. It can also be downloaded from there. It was a super-easy process to upload and looks very professional once it is published. It is also easy to embed the podcast into a website (as seen above). 

Another option for creating podcasts is through the use of Soundcloud. However, the free version is limited. You only have 180 minutes available to upload. Once I uploaded my audio file, I could choose if I wanted the file to be “public” or “private.” If you choose “private,” you can share your podcast using the share link. It was very simple to upload the podcast.  Soundcloud seemed like a nice place to listen to music and audio files. You can follow your favorite artists, labels and friends on SoundCloud and then follow their posts on your stream.

WeVideo is a video editing subscription that we used when adding music to our podcast. They have a free version, which limits the user to only 5 minutes/mo, 1 GB of cloud storage and a max video resolution of 480p. We were able to upload the m4a file into the program, make edits and then convert the video file into a .wav audio file. This program was very simple to edit and add layers to the sound file. There were all different kinds of free music and sound effects available for us to utilize to add to our podcast.

Overall, I really liked how easy Podbean was to upload and host the Podcast. As far as recording and editing, Garage Band took a little getting used to. We ended up using Wevideo, which was an easy-to-use platform for adding music to our podcast. I think that any video recording program can be used and then edited for the final podcast. In my opinion, I believe that Podbean is a wonderful platform for hosting podcasts. We can teach students how use voice recorders (such as Garage Band, Voice Memos, Audacity, etc.) and then give them the skills to edit those sound files and upload them to Podbean for publication.

Using Podcasts in Education
In the library, we can use podcasts to announce new books that are in the library. Podcasts can be created to recommend books to others, or for students to summarize books that they have read. Students can use podcasts as a platform to demonstrate what they have learned about a particular topic, which can be integrated into any academic area.

Check out these great educational podcasts for kids!


Educational Podcasts to Follow
Podcasts are a great resource for educators, too. They can provide ideas for teachers and keep teachers up-to-date on current trends in education. Here are some educational podcasts to follow.


Resources:

Cornwall, G. (Jul 22, 2018). How Genrefication Makes School Libraries More Like Bookstores. MindShift. Retrieved from   https://www.kqed.org/mindshift/51336/how-genrefication-makes-school-libraries-more-like-bookstores

Courtney, L. (n.d.) 18 Great Educational Podcasts for Kids. Retrieved from https://www.aswewalkalongtheroad.com/2017/09/18-great-educational-podcasts-for-kids.html?utm_content=buffer0ebaa.

Dunne, K. (2015, August). Genrefication of the fiction collection in an elementary school library.Research Papers. University of Central Missouri. Retrieved fromhttps://centralspace.ucmo.edu/bitstream/handle/123456789/417/Dunne201530_RP_Genrefication.pdf?sequence=7&isAllowed=y

Eichenlaub, I. (Oct 1, 2018). Genrefication: Removing Barriers to Access. Knowledge Quest. Retrieved from https://knowledgequest.aasl.org/genrefication-removing-barriers-to-access/

Hora, A. (2015). Genrifying the school library's fiction collection. Graduate Research Papers. 94. Retrieved from https://scholarworks.uni.edu/cgi/viewcontent.cgi?article=1094&context=grp

Minton, C. (May 4, 2014). Beyond the Shelves: “Genrefying” a High School Library: A Detailed Planning Document. [web log comment]. Retrieved from https://christyminton.wordpress.com/2014/05/04/genrefying-a-high-school-library-a-detailed-planning-document/

Stiles, L. (2004). Shelf Shifters: Thanks to a New Fiction Section, a Quiet Library Now Has a Booming Business. School Library Journal, 50(9). Retrieved fromhttp://search.ebscohost.com.ezproxy.shsu.edu/login.aspx?direct=true&db=eric&AN=EJ706113&site=ehost-live&scope=site

PEW Research Center. (2018, July 12). Podcast listenership. Retrieved from  https://www.journalism.org/chart/sotnm-radio-podcast-listening/.

Watson, Angela. (n.d.) 12 of my favorite podcasts for teachers. Retrieved from https://thecornerstoneforteachers.com/12-of-my-favorite-podcasts-for-teachers/.

Alexandria Automation Software blog:


Thursday, April 4, 2019

Cartoons and Comics

Graphic novels are becoming more and more popular. Their comic-like style appeals to readers of all ages. What a great opportunity to reach out to students and help support them in a format that they enjoy and are comfortable with! There are many ways to incorporate comics into instruction. 

Here are a few options available for creating comics:


This website can be used for free (without an account) to create comics. There are also resources available for educators about how to integrate comics into classroom instruction located at https://www.makebeliefscomix.com/teachers/. Users can utilize as many as 18 (max) frames to create their comic, adding frames with a simple click of a button. There is a toolbar at the bottom of the screen where you can select characters, masks, thought bubbles, balloons and prompts, objects, background images and background colors. Users can simply double click the image and click the frame where you want the image placed. The images (once placed) can be moved within the frame. 

While I enjoyed the simplicity of creating a comic without having to worry about registering and signing in (which makes using this program with students a little easier), this program did have some limitations. There were a limited supply of background and characters to choose from. I struggled to find a background image to use to tell my story. The characters had multiple poses to choose from, offering some flexibility; however, this was again limited. The characters that I chose only had 4 poses each, which made telling my story a little difficult. Another limitation was that once the images where place, the sizing could not be adjusted. Sometimes I wanted to make my speech bubble larger, but I ended up having to delete it and replacing it with a larger bubble. It took me a little while to find out how to save my comic, but I eventually was able to download it to my computer. I also ended up creating an account so that my comic could be saved online for access to later.


Toon Doo was a comic-creating online program that was super-simple to use. When users create a comic, they first get to choose a layout for their comic. Once a layout is chosen, users are taken to an editing page, where they can add characters, backgrounds, props, texts (like speech bubbles), and clipart. This option provided a greater selection of backgrounds, organized under different “topics,” such as scenery, space, abstract, fantasy, indoors, outdoors, landmarks and sports. To choose an element to add to your comic, you simply drag and drop the element into your frame.

What I loved about this program was that all the elements were editable. For example, users can shrink, enlarge, clone, flip, rotate and adjust layers, simply by clicking a button on a toolbar at the bottom of the editing screen. It took me a little while to find where to find the “save” button, but I eventually found it under the “Start Here” drop down menu. Overall, this program was very easy to use and students would easily be able to manipulate the elements to create their own comics.


Pixton was a comic creating program that was easy to use; however, the “free” version did not have many options available. When I opened my free educator account, I was able to get 1 pack of backgrounds. This limited the types of comics that I could make. The search bar located at the top of the editing screen stated, “Search 335 backgrounds.” I decided to search “school,” to see what appeared. There were many great backgrounds available, but they were all available for purchase only. Users could purchase “content packs” to have access to additional content. For non-members, these content packs were available for $14.99 each. Once purchased, users would have access to new backgrounds, background effects, objects, characters, outfits, poses and expressions. Users can become a member for $9.99 a month and receive a monthly credit for 1 free content pack.

To create the comics, users can select backgrounds and add frames to the comic. They can then add characters, zoom, add words, faces, poses and effects. What I really liked about this program was that the facial expressions and poses could be changed depending on what you wanted your character to do. This was the most flexibility of characters that I have seen out of all the other programs. I loved that I could change the expression of my character based on what was happening in the scene. Once the character was placed on the frame (users double-click the image and it appears in the frame), it remains in one spot. I could not find a way to manipulate either the characters or the words once they were added to the scene. Luckily, it still worked out okay. When my comic was complete, I simply clicked the “Done” button which took me back to my “Comics I Have Created Page,” where it was easy to print or save. This program was a little more difficult to manipulate, even though I was much more pleased with the flexibility of the characters. I think that older students may have more success with this program, but younger students may be challenged by it.

Using Cartoons and Comics in the Classroom 

With the growing popularity of graphic novels, comics are a perfect way to connect with students and help support instruction and assessment. Comics are a wonderful platform for students to show what they have learned about a topic. A mini-professional development session could be perfect for introducing this concept to teachers.  It could be started by sharing a comic (created by the librarian) that shows the benefits in using comics in education. Ideas on how to integrate comics into instruction and assessment can be presented, as well as the different options available for students to use. Some ideas on using comics in the classroom are:

  •          Digital storytelling
  •          Retelling a story they read or heard
  •          Brainstorming ideas about a topic
  •          Creating “Complete” the story activities
  •          Raising awareness of topics (racism, bullying, etc.)
  •          Teaching vocabulary, grammar, communication, etc.
  •          Introducing Creative Writing
  •          Practicing Life Skills
  •          Creating Autobiographies


Resources:

Educator Technology and Mobile Learning. (2018, January 24). Teachers Guide to the Use of Comic Strips in Class: Some Helpful Tools and Resources. Retrieved from 

MacDonald, H. (2013, May 3). How Graphic Novels Became the Hottest Section of the Library. Publishers Weekly. Retrieved from https://www.publishersweekly.com/pw/by-topic/industry-news/libraries/article/57093-how-graphic-novels-became-the-hottest-section-in-the-library.html.

Zimmerman, B. (n.d.). 20 Ways to Use Makebeliefscomix in the Classroom. Makebeliefscomix. Retrieved from https://www.makebeliefscomix.com/26-ways-to-use-mbc-in-the-classroom/

Sunday, March 24, 2019

Videos and QR Codes in the Library


YouTube

Video creation has now become a tool for both teachers and students to use in many ways. Videos can be “how-to” videos for students and staff, student projects and reflections, informational videos for students, commercials for new books and/or overdue books, or showcasing videos that show others some of the things that are happening around the library or around the campus. These are some libraries who have used YouTube Videos in a creative way to both help students and connect with students!

The NHS Library
I feel that this video is most helpful for students, because it reviews EBSCO host, including the Student Research Center, how to search the databases, and how to find your citations for articles.


In this video, the high school mascot visits the library and showcases the library in a fun way. I think students would really appreciate and enjoy this video.


I love how The Unquiet Library includes student projects and reflections. It is an excellent way to move student projects beyond the walls of the school, so that others can view what students are learning. The librarian also includes some wonderful tutorial videos here to help students understand how to use different tools when they are researching and creating. Many of the videos are set to music that is fun and upbeat, which would keep students engaged.

There are so many tutorial videos this channel features that would be very helpful to students, including how to use EasyBib, how to embed content, how to export bibliographic information, how to find and use images, etc. This video would be very helpful to students, because it discusses Creative Commons Licensing and why students (and staff) should care about it. It was created using Animoto, but it helps students be mindful of copyright laws and helps them be ethical in their use of music, images, etc.


I also loved this video that was created to show students some of the new titles that were added to the library. I think students would love to see all of the new books that have been added. What a great way to showcase new books and increase student interest!


This channel had a ton of great videos, including student products.
This video, hosted on the channel, records a financial aid workshop that was held for students and parents. The school counselor provided this workshop and it was recorded. I think it is a great resource that students would find helpful, if they were unable to attend the workshop.


This video was created by students to provide information and remind their peers about filling out their FAFSA application. It was very creative and I think it is a video that students would enjoy watching.


BBMSMedia channel was my favorite channel. Many of these videos were created by students and were so creative! There were many informational tutorial videos on this website, that students would find helpful, including this video which reviews the eResources available to students.


I just loved all of the Overdue book videos created by students. I think that students would really like these, because many of them are parodies or are based on media (songs, movies, etc.) that are trending. I especially enjoyed the Star Wars Overdue video!


There are so many ways to incorporate video creation into the library. However, what if your school blocks YouTube? There are other options available for teachers to share videos. Some of these options include:  School Tube, Teacher Tube, Next Vista or Academic Earth. There are more alternatives to YouTube that can be found at https://www.freetech4teachers.com/2010/09/47-alternatives-to-using-YouTube-in.html. Are you worried that inappropriate ads could appear while you are showing students YouTube videos? View Pure or Safe Share are some options that are available to “clean up” your videos from unwanted ads or other distractions.

Using Videos in the Library


Tutorials and/or Demonstrations
Videos can be created and placed on a library channel to inform students and staff of some of the resources available including the library webpage, accessing online databases, viewing the online catalog, etc. You can also walk through different apps and websites, showing students how to use different applications to help them with their research and/or projects.

Showcasing School and Library Events
Slideshows and videos can be created to showcase some of the events that are going on around the campus. For example, a slideshow can be created displaying the pumpkins students created for the Storybook Pumpkin Patch. Pictures of Family Literacy Nights can be created into a movie.

Student Products
Student-created videos can be placed on a library Youtube channel. This allows peers the opportunity to see all of the interesting things that they have created and provides a global platform for students.

Book Trailers and/or Book Talks
These videos can be created to promote new books in the library. Book trailers and book talks help increase student interest in new titles.


QR Codes

QR codes have made their way into the world of education. All you need to do is generate a QR code and others will have instant access to websites, text, geolocations, email, etc. To read the codes, you simply need to download the QR reader to scan the code. Newer iOS updates even have a QR code reader built into the camera, though it will ask to confirm if you want to be forwarded to the website.

Below, I have created  a QR code for a book trailer that I created using Animoto. I used http://goqr.me/#t=url to create my QR code, just for the simplicity of saving it as a .jpeg file. Other websites that I visited, including https://www.the-qrcode-generator.com/ and https://www.qr-code-generator.com/ asked me to upgrade in order for me to save as a .jpeg. The default option was a .png file.


“Trees can't tell jokes, but they can certainly tell stories. . . .

Red is an oak tree who is many rings old. Red is the neighborhood "wishtree" — people write their wishes on pieces of cloth and tie them to Red's branches. Along with her crow friend Bongo and other animals who seek refuge in Red's hollows, this "wishtree" watches over the neighborhood.

You might say Red has seen it all. Until a new family moves in. Not everyone is welcoming, and Red's experiences as a wishtree are more important than ever.” (Goodreads.com)

Scan the QR code below to view my book trailer. 


Using QR Codes in the Library


Book Trailers
QR codes can be placed on the covers of books for students to view a book trailer of the book before checking it out. (These codes can also be placed on shelves or near books.)

Library Orientation
QR codes can also be used in a library orientation. The codes can be linked to videos where the librarian discusses different sections of the library. As students go around the library and scan the codes, they can learn what types of resources are available in each area.

Promotional Materials
By placing QR codes on posters, bookmarks and fliers, you can provide instant access to things like the library website, the online resources, the library’s social media accounts, etc. It can even be connected to Google Forms for surveys or a form for volunteers to fill out.

Scavenger Hunts
Students can go on scavenger hunts thoughout the library, scanning QR codes for clues and finding out information about different genres, authors, and series.

Student Projects
QR codes can be linked to student projects. Videos can be created explaining the students’ research process and how they gathered information for their topic. These “behind the scenes” videos can be placed near student projects for more information.

Sources:

[Bbmsmedia]. (2018, May 31). Luke Skywalker Has Overdue Books [Video File]. Retrieved from https://www.youtube.com/watch?v=ivht6CPe1Ek.

[Bbmsmedia]. (2017, October 23). eResources @BBMA [Video File]. Retrieved from https://www.youtube.com/watch?v=Ht7cv39Vbr4&t=4s.

Byrne, R. (2010, September 1). 47+ Alternatives to Using YouTube in the Classroom. [Blog post]. Free Technology for Teachers. Retrieved from https://www.freetech4teachers.com/2010/09/47-alternatives-to-using-YouTube-in.html.

Byrne, R. (n.d.). Alternatives to YouTube. [Blog post]. Free Technology for Teachers. Retrieved from https://www.freetech4teachers.com/p/alternatives-to-YouTube.html.

Gilstrap, C. [Calypso Gilstrap]. (2015, March 12). How to Use EBSCO Host [Video File]. Retrieved from https://www.youtube.com/watch?v=BezObVKkqOo&t=272s.

Gilstrap, C. [Calypso Gilstrap]. (2015, May 4). Tiger Visits the Norman High Library [Video File]. Retrieved from https://www.youtube.com/watch?v=NeUhXLvFAi4&t=95s.  

Lamb, A. (2013, January). Scan Me! QR Codes in the School Library. [Website]. Retrieved from http://eduscapes.com/sessions/qrcodes/.

[pikesvillehslibrary]. (2015, March 12). PikesvilleHighschool FAFSA. [Video File]. Retrieved from https://www.youtube.com/watch?v=DVyIaw40neY

[pikesvillehslibrary]. (2013, December 16). PHS Financial Aid Workshop 2013 [Video File]. Retrieved from https://www.youtube.com/watch?v=esKCAk_t6v0&t=841s.

 [Theunquietlibrary]. (2012, August 27). Creative Commons Licensing: What Is It & Why Should I Care? [Video File]. Retrieved from https://www.youtube.com/watch?v=L8zSYqvAJuI.

[Theunquietlibrary]. (2012, April 12). New Arrivals, April 2012 [Video File]. Retrieved from https://www.youtube.com/watch?v=1Q7RjsFNFRs

Zinkovich, B. (2015, January). Using QR Codes to Promote Your Library. Retrieved from https://www.ebscohost.com/novelist/novelist-special/using-qr-codes-to-promote-your-library.


Thursday, March 21, 2019

Screencasts in Education


Screencasts are a great way for educators to share their screen and demonstrate learning through demos and tutorials. It makes it easy to walk through new websites, apps and technology concepts without being in a face-to-face environment…and, the great thing about them is that they are recorded and can be saved for a reference at another time. Wouldn’t it be amazing if your library could have a collection of “how-to” videos for teachers and students about how to use technology?

When I was exploring some of the ways to create screencast videos, I found that Screencast-O-Matic and Screencastify were my favorite. I also created a “mash” between Apple ipad “Screen Recorder” and iMovie. I thought it would be a great opportunity to showcase new apps that teachers can use to integrate technology.

Now, while I did enjoy the final product, I found Screencast-O-Matic to be a little more difficult to access. The Screen Recorder Launcher had to be downloaded to my computer, but I didn’t find an easy way to access it from my “Applications.” I had to go back to the Screencast-O-Matic website (https://screencast-o-matic.com/) and then click “Start Recorder.” Then, it provided me the option to record my screen, my webcam, or both. When I chose to record my screen, it provided me an adjustable screen frame to adjust what it records. This was nice, because I could “crop-out” my tabs and other areas that I didn’t want my viewers to see. When you start recording, it gives a 3-second countdown before it starts recording. When the recording is complete, you can click “done,” and choose what you would like to do with the recording. You can save as a video file, upload to Screencast-O-Matic, or Upload to Youtube.

The free option is a limited version, but there is option to upgrade to Solo Deluxe ($1.50/month billed yearly) or Solo Premier ($4.00/month billed yearly).

Here is an example of a screencast created using Screencast-O-Matic. This video was created to show students how to access Destiny Discover from our online library catalog.


Screencastify (https://www.screencastify.com/) is a screen recorder from Chrome that is available as an extension. Once it was added, it was super-easy to use. A small icon shows up on my toolbar, which is easy to access.

Once it is installed, you simply click the icon to choose what kind of video you want to make; either a browser tab, the desktop, or the webcam. One disadvantage to using this program is that you can’t record both the screen and the webcam simultaneously using the free version like you could on Screencast-O-Matic. The default countdown is set at 3 seconds, but can be adjusted. For the free version, the time-limit per video is only 10 minutes and a limit of 50 videos can be recorded each month. Users can also upgrade to the Premium version for unlimited videos and an unlimited recording length for $24.00 a year.

When recording a video with Screencastify, users are asked if they want to share their entire screen or the application window. It counts down and users can record and have access to drawing tools. Once users are done recording, they can click the icon on the toolbar, or click “Stop Sharing,” which is displayed at the bottom of the screen. Users can then have the option to upload the videos to the Google Drive or copy and share the link. I really loved how easy it was to just have it automatically show up in my Google Drive. From there, it is easy to access in the future or share with others through our district Google Drive.

Here is the screen recording I made using Screencastify. This recording walks through our library webpage and lets viewers see some of the resources that we have available to them on that webpage.


iPad Screen Recorder/iMovie Mashup
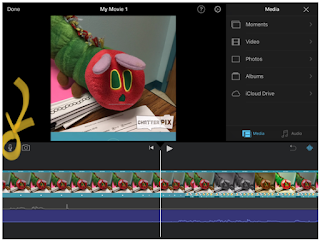
I wanted to be able to have a way to create videos that walk teachers through some of the ipad apps that are available, how to use them, and how they can be implemented into instruction. So, from my Control Panel screen, I clicked on “Screen Recorder.” Now, the screen recorder does record sound coming from the ipad, but it does not record outside sound so it did not record my outside narration. This had to be added later through iMovie.


Once you click the Screen Recorder button, it will count down from 3 before it will start recording the screen. But, you can go through the motions of what to do, being aware that you will need to add sound later. You may want to just narrate as you go  to make sure that you are good with your timing. 


Once your screen is recorded, you open the iMovie app and upload your video there. Then you can add a voiceover to your movie by clicking the microphone icon. It is not as “seamless” as the other screencasting programs, but if you want to create a movie on an ipad to demonstrate something, this “mash-up” makes it possible.

Here is the screen recording that I made with the iPad Screen Recorder and with iMovie. It shows teachers about the Chatterpix app and how it can be used in the classroom.


After viewing all of these versions, I think that the screencast program that I liked using best was Screencastify. I just liked how easy and seamless it was to record my screen and share my information.

There are many ways that Screencasting can be used in the classroom. Teachers and librarians can use it to demonstrate new technologies or showcase new apps, but it can also be a wonderful tool for students to show their learning. Students can talk through different things that they have learned or walk through products they have created. Kathy Schrock has a ton of useful screencasting resources, including general information and rubrics to use for screencasts at her website http://www.schrockguide.net/screencasting.html.

Sources:
Schrock, K. (2018). Screencasting and screen recording in the classroom. Retrieved from http://www.schrockguide.net/screencasting.html.

Sunday, March 10, 2019

Infographics


An infographic is a visual representation of information. It is the act of taking raw data and turning it into visual forms that the human brain can easily access and process. Teaching with infographics can be beneficial to students, because it can be a jumping start for learning, providing visual information for students to understand. Having students create their own infographics to demonstrate learning requires critical thinking and provides students practice with charts, graphs, and maps – all essential skills that students will be expected to understand on standardized tests (Schulten, 2010).  Diana Laufenberg states “Infographics work in the classroom because they grab students and allow an entry point to learning — and because they sum up pages and pages, even chapters, of information that would take a reader hours to process” (as quoted in Shulten, 2010).

So how do we create an infographic? When creating an infographic, we need to have information and data. Once we have the data, it is our job to analyze the data and determine what information we need to translate into visual data. According to Alberto Cairo, in his podcast with Connie Malamed, a question we need to ask ourselves is, “what is it more likely that my audience, the people who are going to see this graphic, are going to try to do with this graphic?” (Malamed).  For my infographic, I accessed research about book consumption in the United States from the PEW Research Center (www.pewinternet.org) (Perrin, 2018).

Once we have spent some time analyzing the information and determining what information we would like to represent visually, we can begin to create our infographic. Some of the websites that can assist with creating infographics are Piktochart (https://create.piktochart.com), Infogram https://infogram.com), and Easelly (https://www.easel.ly/).  Here are some of my thoughts on each of these websites.


Easelly had several templates to choose from, but one of the problems that I noticed with this website is that the options were kind of limited. In order to “unlock” more options of images, charts, etc., you need to “Go Pro” and upgrade for $4.00 a month. Other than the slim amount of choices, the site was fairly easy to use. The text was easy to change with a double-click and it was simple to move objects around on the infographic. When I wanted to add a pictogram to my infographic,  I did have some trouble getting the pictogram images to change to something relevant to my topic, rather than the default strawberry or popsicle image. While I feel that this website is very basic, it might be a great starting point for students to begin to explore infographics. 


Piktochart was very easy to use and had a nice variety of different images, shapes, photos and photo frames that can be added to an infographic. This website actually had the most variety of images that I was looking for that had to do with books (which was the topic of my information). The search bar made it even easier to find images that were relevant to my topic. The tool bar at the top of the infographic made it easy for users to work with the different elements on the page. For example, users can change the colors, the opacity, alignment, arrangement, etc.  The Piktochart infographic has different “sections” of information that users can customize, versus the one big “chart” that users are adding to while using the other websites (Easelly & Infogram) for their design. This website definitely had a lot more options to choose from, but at times it seemed a little overwhelming to view all of the options that were available. What I liked best about this website was the simplicity of use. Everything was easy to customize and use to represent information in the infographic.


This was the website that I chose to use to create my infographic. The templates were very clean and it was easy to choose one where I felt comfortable manipulating the images and information. The options for adding information and elements were located on the left-hand side of the page, where I could choose what I wanted to add and simply drag it into the infographic. There were multiple choices for text, charts, maps, images, shapes and options to add other types of media including youtube videos, vimeo videos, slideshares, flickr images, urls, etc. Data could be uploaded from different forms, such as a .xls file, a .csv file, a Google Drive spreadsheet, Dropbox, etc. The elements on this site were easy to manipulate. Once an element was clicked, information for that element would appear on the right-hand side of the page. Users can adjust things like the width and height of the element, the information provided in that element, colors, alignment, background, etc. 

Overall, my favorite website to use to create infographics was Piktogram, just because of its ease of use and its variety of elements that can be included to represent various forms of information. However, for the purpose of creating a visually appealing infographic with the information I had, I chose Infogram. I really liked the clean templates that were not overwhelming and were easy to manipulate. I feel that any of these websites would be great for introducing students to infographics by giving them an opportunity to explore and create.

Sources:
Malamed, C. (n.d.). EC 010: How to design real (not  fake) information graphics. [Podcast.] Retrieved from http://theelearningcoach.com/podcasts/10/

Perrin, A. (2018, March 8). Nearly one-in-five Americans now listen to audiobooks. Retrieved from http://www.pewresearch.org/fact-tank/2018/03/08/nearly-one-in-five-americans-now-listen-to-audiobooks/.

Schulten, K. (2010, August 23). Teaching with infographics: Places to start. The Learning Network. Retrieved from https://learning.blogs.nytimes.com/2010/08/23/teaching-with-infographics-places-to-start/?_r=0.

Schulten, K. (2010, August 27). Teaching with infographics: A student project model. The Learning Network. Retrieved from https://learning.blogs.nytimes.com/2010/08/27/teaching-with-infographics-a-student-project-model/.

Thursday, January 24, 2019

Social Media and Libraries

Facebook
Facebook has become a “staple” in the land of social media. Many hours are spent browsing Facebook and getting caught up on our friends’ lives, reading about what’s happening around the world, and even spending time shopping. Facebook is a method of communication that is easily accessible for many people and it is a great way to libraries to communicate what is happening within the library and to communicate what events students and parents can look forward to. It is also a great way for librarians to advocate for their libraries.

What I have found through my exploration of school libraries on Facebook is that there are many great things that are happening in libraries! Libraries are using Facebook as a forum for communication and to showcase all of the wonderful things that are taking place with students and books! One of the pages that I visited was Bette Perot Elementary School Library (https://www.facebook.com/BettePerotElementarySchoolLibrary). On their Facebook page, they have posted pictures of things that are happening in the library, links to newsletters, new books, pictures of students reading, etc. They are using it as a means to communicate to students, parents and community, and show them what is happening in the library.

One page that I have followed for awhile is Library Learners (https://www.facebook.com/LibraryLearners/). This page is hosted by a San Antonio librarian, but it is a place where librarians can come together, ask questions, share information, etc. I have used this Facebook page as a resource when I am searching for new library programming ideas. It is a forum where all ideas are welcomed and supported.

One advantage to using Facebook is that it is a place where you can advertise upcoming events such as book fairs, family literacy nights, school events, etc. As mentioned above, it is a fast and easy means to communicate and advocate for your library. 

One disadvantage to using Facebook is that there may be some people in your school and/or community that do not have Facebook and do not have a means to access Facebook. Another disadvantage, which needs to be considered in all aspects of communication, is the FERPA guidelines, which protects the privacy of students. Sometimes, people may be eager to post what is happening in the library, but we must be aware and utilize ways to protect student privacy. This can be done through the use of photo "stickers" or photo blurring, but it can also be a bit time-consuming. For more information about FERPA, visit https://www2.ed.gov/policy/gen/guid/fpco/ferpa/index.html.

With the evolution of new "bigger and better" technologies, Facebook's popularity may be dwindling. While parents may still access Facebook regularly, the younger generation is looking for new ways to communicate with their peers, and forums like Facebook are used less and less when compared with other methods of communication like Snapchat and Instagram. However, as an elementary school librarian, I still believe that it is a good way to communicate with parents and update them about things that are happening. I have just started my own library Facebook page, located at fb.me/JRESLibrary.

Twitter
Twitter is another method of communication that libraries are beginning to use. These “micro-blogs” allow users to share small bits of information, along with a text to discuss things that are happening, upcoming events, etc. I use Twitter to let others know what is happening in my library, but I would like to use it more than I do. I think it is a wonderful way to showcase the learning that is happening on your campus. My twitter handle is @JRES_Librarian. I love to use Twitter as a resource to keep up on what is happening in the world of libraries. I follow authors, book reviews, other libraries, librarians, etc.

Many times, leaders in educational technology will post new strategies/tools that teachers/librarians can use to integrate technology into classroom instruction. For example, in this tweet by Kathy Schrock, she includes a link to new learning tools that can be used in the classroom, such as Translate, that are now a part of Microsoft’s products:
Gwyneth Jones (@GwynethJones) is a future ready library and innovator. Many of her posts include new ways to use technology, like this tweet with a link to a Screencastify video:

Or this tweet, about a new hyperdocs unit:


Another "Tweeter" I like to follow is John Schu (@MrSchuReads) to see all of the new books that he posts about!  This gives me ideas on new, quality children's literature that I can read to my students. Many of his favorite children's books are displayed in images that he tweets. For example:

Twitter is a very quick way to communicate. As Cassell & Hiremath state, "tweeting has been recognized as an efficient way to provide quick updates, bulleted information, enhance publicity or reinforce library messages" (Cassell & Hiremath, 2013, p 437). The only disadvantage of Twitter is that the tweet can only be 140 characters, which can sometimes pose a challenge, especially if you are tagging others and/or adding hashtags.


Instagram
Instagram is a great way to advertise the wonderful things that are happening in your classroom or library. It is also a great way to connect with other educators. Instagram has recently become my "go-to" for new ideas for lessons, bulletin boards, new books, etc. For example, I love to see what other librarians are reading in their libraries! When using Instagram, you can follow individuals, or you can follow different hashtags. For example, some of the hashtags I follow are #librariansofinstagram, #librarydisplays and #elementarylibrarian. By following these hashtags, I am able to connect with other librarians who have similar interests. Once you have begun to "follow" different people/hashtags, Instagram will also recommend other individuals/hashtags, based on your preferences. It is a quick and easy way to share things that are happening and/or things you would like to showcase that you are doing in your library or classroom.

One disadvantage of using Instagram is that there is not a way to add links to the posts to direct followers to content. Many users of Instagram have found a way around this by using applications such as Link In Profile (https://linkinprofile.com/) or Linktree (https://linktr.ee/) to provide external links to posts and content.

Even though there are some disadvantages, I really enjoy using Instagram for ideas and to see what others are doing in their libraries. You can follow some of my Instagram posts at https://www.instagram.com/melynn7079/.

Sources

Cassell, K.A. & Hiremath, U. (2013). Reference and Information Services: An Introduction (3rd ed.). Chicago, IL: Neal-Schuman. 

Tholfsen, M. (2019, January 9). 10 Learning Tools updates for the new year, including Translate and inclusive math improvements. Retrieved from https://techcommunity.microsoft.com/t5/Education-Blog/10-Learning-Tools-updates-for-the-new-year-including-Translate/ba-p/308190
 
U.S. Department of Education. (2018, March 01). Family Educational Rights and Privacy Act (FERPA). Retrieved from https://www2.ed.gov/policy/gen/guid/fpco/ferpa/index.html